
Vinyl plank flooring has become a popular choice for homeowners due to its durability, aesthetic appeal, and affordability.
Nevertheless, to ensure the longevity and optimal function of your vinyl plank flooring, the underlayment plays a crucial role.
This foundational layer, often overlooked, is integral to the flooring’s performance, providing insulation, sound absorption, and comfort underfoot.
In this blog post, we aim to educate you on the importance of underlayment, the different types available, and how to choose the right one for your specific needs.
Let’s delve into the world of vinyl plank flooring and uncover what lies beneath the surface!
The Role of Underlayment
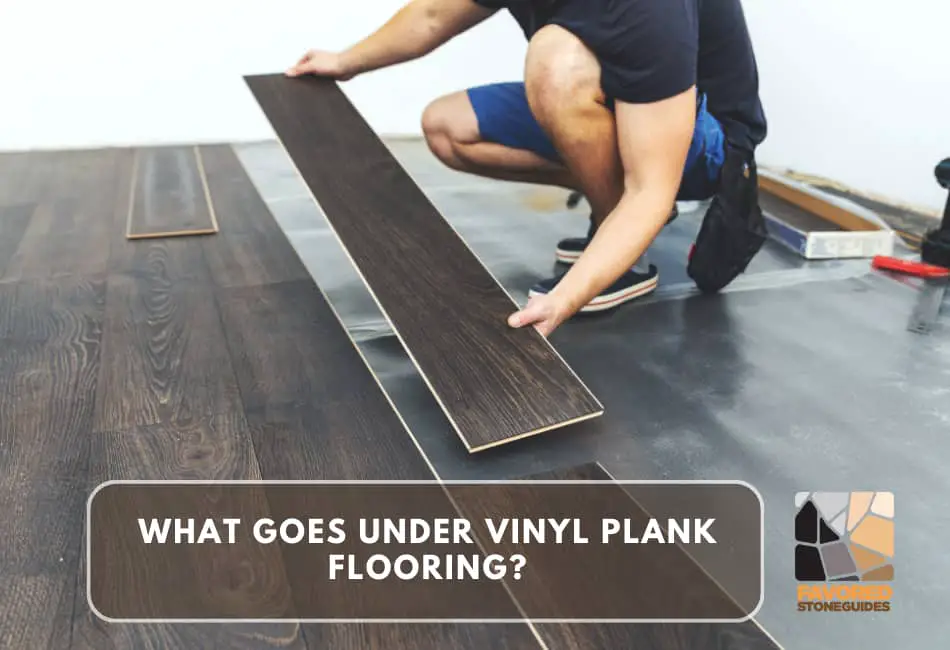
When I first embarked on installing vinyl plank flooring, the term ‘underlayment’ was foreign to me.
Simply put, underlayment is a layer of material between your subfloor and your new flooring, acting as a buffer and providing additional benefits that we’ll delve into shortly.
Without it, I soon learned your flooring can be vulnerable to damage and may not function as efficiently.
Key functions of underlayment
Given its role, underlayment performs a number of key functions:
- Moisture barrier
This was a critical consideration for me since my house is in a humid region.
The underlayment is a moisture barrier, protecting the vinyl flooring from any water damage that could warp or displace the planks.
- Sound insulation
I was pleasantly surprised at how the underlayment reduced the noise levels.
The layer acts as a sound barrier, absorbing noise and preventing sound transmission.
This feature was particularly beneficial in my upstairs rooms, where foot traffic and noise from movement were a concern.
- Thermal insulation
The underlayment also provides thermal insulation, contributing to energy efficiency and making the floors comfortable even in colder weather.
Significance of underlayment in vinyl plank flooring installation
In the process of installing my vinyl plank flooring, I realized the significance of the underlayment.
Beyond its protection, the underlayment also smoothed out minor inconsistencies on the subfloor.
This ensured a smoother installation process and a better final result.
Understanding the true importance of underlayment in vinyl plank flooring installation has made all the difference in my flooring project, and I’m confident it will in yours too.
Types of Underlayment for Vinyl Plank Flooring
During my journey of laying vinyl plank flooring, I explored various types of underlayment, and each had unique benefits and drawbacks.
Here’s a closer look at my experience with each of them:
Foam Underlayment
1. Lightweight and easy to install
Foam underlayment was an absolute breeze to work with. It’s so lightweight that you can quickly move it around, and installing it was as simple as rolling it out.
2. It provides good sound insulation
While it’s not the most powerful in sound insulation, the foam underlayment I used did a decent job of muffling footsteps and other everyday noises in my home.
3. Limited moisture protection
If there’s a drawback to foam, it’s that it doesn’t offer substantial moisture protection.
Since my house is in a humid region, I decided to use it only in the rooms where humidity was least likely to be a problem.
Cork Underlayment
1. Natural and eco-friendly option
I loved the idea of using a natural, eco-friendly material like cork.
It gave me peace of mind knowing my floor was having a lesser impact on the environment.
2. Excellent for sound insulation
Of all the underlayments I tried, cork was the champ regarding sound insulation.
It made an audible difference in the noise level, especially in the upstairs rooms.
3. Moderate moisture resistance
While cork isn’t waterproof, it does resist moisture to a certain extent. However, I wouldn’t recommend it for very damp areas.
Rubber Underlayment
1. High durability and moisture resistance
Rubber underlayment was a revelation.
Not only is it incredibly durable, but its moisture resistance is top-notch, making it ideal for my home’s wetter areas.
2. Superior sound and thermal insulation
Rubber also shone in the sound and thermal insulation department.
I noticed a significant noise reduction, and my floors felt warmer too.
Plywood Underlayment
1. Suitable for leveling subfloors
Plywood was a godsend in the rooms where my subfloors had minor imperfections.
It leveled out those inconsistencies and paved the way for a smooth installation.
2. Offers moderate sound and moisture protection
Although plywood doesn’t excel in sound or moisture protection, it offers a balanced performance in both areas.
Again, it’s not the best option for moisture-prone zones, but it performs reasonably well otherwise.
There’s no ‘one-size-fits-all’ underlayment for vinyl plank flooring. The ideal choice depends on your specific circumstances and requirements.
From my experience, finding the proper underlayment is just as rewarding as seeing your beautiful floor come together!
Choosing the Right Underlayment
Deciding on the proper underlayment can feel overwhelming, but I can assure you that with the right factors in mind, you can make an informed decision that fits your needs perfectly.
Things to Consider When Selecting Underlayment
1. Subfloor Condition
One key factor that influenced my underlayment choice was the condition of my subfloor.
Like me, if your subfloor is uneven or has minor imperfections, an underlayment like plywood can be a lifesaver.
It did a fantastic job leveling out those inconsistencies and preparing my floors for a smooth installation.
2. Installation Location
Another key consideration was the installation location.
I found that rubber underlayment was perfect for wetter areas of my home, like the kitchen and bathroom, thanks to its excellent moisture resistance.
On the other hand, cork worked wonderfully in my upstairs rooms, providing much-needed sound insulation.
3. Moisture Levels
The level of moisture in your home is another crucial factor to consider.
If you’re dealing with damp areas, cork underlayment might not be the best fit, as it only offers moderate moisture resistance.
In my case, I opted for rubber in these situations, given it’s waterproof nature.
4. Budget Considerations
Budget is always a significant factor in any home renovation project.
In my experience, plywood was a more cost-effective option, while rubber was at the higher end of the price spectrum.
However, remember that each option offers different benefits, so it’s essential to balance cost and value.
5. Consultation with Flooring Professionals
Lastly, don’t underestimate the value of consulting with flooring professionals.
They can provide tailored advice based on your specific circumstances, which can be invaluable.
I found chatting with a professional incredibly helpful – they guided me toward the best underlayment option for my vinyl plank flooring based on my unique needs and preferences.
Installing Underlayment for Vinyl Plank Flooring
Before we delve into the specifics of installing underlayment for vinyl plank flooring, let me share with you a little anecdote.
I remember my first attempt at laying underlayment – it involved a lot of trial and error and the occasional frustrated sigh.
I want to help others navigate this process with as few hiccups as possible.
Pre-installation Preparations
Preparation is key when it comes to a seamless installation process.
The first time I was about to install an underlayment, I made the mistake of diving in head first without taking the time to prepare appropriately.
I failed to properly clean and level the subfloor, which led to a less-than-perfect finish.
From that day on, I learned that a bit of time spent preparing can save a lot of time correcting mistakes.
Steps for Installing Underlayment:
1. Roll or Lay the Underlayment
Start by rolling out or laying down your underlayment material over the subfloor.
I will never forget the satisfaction of rolling out my first underlayment sheet – it was a sign of progress and a step closer to my dream flooring.
2. Seaming and Taping
Next up is seaming and taping. It might sound simple, but this step is crucial for ensuring a smooth and secure underlayment.
During my first installation, I skimped on the taping and ended up with a poorly secured underlayment that later caused issues. I recommend taking your time with this step – making sure the tape is securely adhered and the seams are perfectly aligned.
3. Cutting and Fitting
The final step is cutting and fitting the underlayment. This is your chance to ensure that your underlayment fits perfectly within the confines of your room.
I recall the nervous excitement I felt during my first cutting and fitting process – there’s something uniquely satisfying about seeing everything come together ideally.
Ensuring a Smooth and Level Surface
Finally, take the time to ensure your underlayment provides a smooth and level surface for your vinyl plank flooring.
Trust me, this step is worth the extra effort. During my initial renovation project, I rushed through this stage and ended up with a slightly uneven floor.
Since then, I’ve realized the importance of this final check – it ensures your flooring looks professional and feels comfortable underfoot.
Common Mistakes to Avoid
Through my home renovation journey, I’ve made my fair share of mistakes.
To help you bypass these common underlayment pitfalls, I’ve compiled a list of common errors and how to avoid them.
- Using the Wrong Type of Underlayment
I can’t stress enough the importance of choosing the proper underlayment.
Initially, I thought all underlayments were created equal – a mistake that cost me time and money when I had to replace an incompatible underlayment.
Different flooring types require specific underlayments, so ensure you do your research or consult with a professional before making a decision.
- Inadequate Moisture Protection
Another significant mistake I made during my first DIY flooring project was overlooking the importance of moisture protection.
I didn’t think it was necessary for my relatively dry house.
But, I soon learned that even minor moisture can cause significant damage to the flooring over time.
Always opt for an underlayment with a built-in moisture barrier, especially for areas like the basement or bathroom.
- Neglecting Subfloor Preparation
Rushing through subfloor prep was another error in my early flooring days.
I was so eager to get to the actual flooring installation that I neglected to prepare the subfloor correctly.
This resulted in an uneven finish and ultimately led to premature wear and tear.
Now, I know that taking the time to clean, level, and dry the subfloor is crucial for a successful flooring installation.
- Skipping the Underlayment Altogether
Finally, the biggest mistake to avoid is skipping the underlayment altogether.
I know it can be tempting to save time and cost but trust me when I say the underlayment is an investment worth making.
The one time I skipped this, I ended up with a noisy, uncomfortable flooring that I eventually had to redo.
An underlayment provides added comfort, noise reduction, and longevity to your flooring – a step that should not be overlooked.
Conclusion
Reflecting on my past flooring projects, I can’t stress enough the significance of the underlayment.
It’s more than just an extra layer – it’s a crucial component that contributes to the longevity, comfort, and structural integrity of your flooring.
I recall installing flooring without an underlayment, only to be met with an irritatingly noisy floor that lacked comfort.
From that day, I vowed never to underestimate the power of a good underlayment.
Choosing the proper underlayment for your specific flooring type, properly installing it, and then maintaining it over time may seem daunting, but I assure you, it’s all worth it in the end.
I’ve learned this the hard way after a series of failed DIY flooring projects.
Now, I take my time to research, consult with professionals when necessary, and make sure my subfloor is well-prepared before installing the underlayment.
I’ve found that this attention to detail dramatically improves the result.
Embarking on a flooring project can feel like navigating uncharted territory, but remember, every expert was once a beginner.
Use my experiences as a guide, and arm yourself with as much information as possible.
I strongly encourage you to view the underlayment not as an optional extra but as a fundamental part of your flooring.
Your future self will thank you when you’ve been enjoying a beautiful, comfortable, and durable floor for years. Good luck!