
Marmarino Medium is a versatile Venetian plaster finish, popular for its subtle texture, depth, and earthy elegance.
When applied with a textured technique, it creates a unique, rocky, matte look that transforms both residential and commercial spaces.
Whether you’re finishing a cozy accent wall or a large commercial feature, this guide walks you through each stage—from surface preparation to the final wax.
Let’s dive in.
1. Preparing Your Wall
Steps:
- Ensure the wall is clean, dust-free, and dry. Remove any dust, grease, or debris.
- Apply a quartz primer: This primer provides a gritty surface that improves adhesion for lime-based plasters like Marmarino Medium. Use a paint roller for large surfaces and a brush for corners.
- Allow the primer to dry completely—ideally overnight or at least several hours.
Once the wall is prepped, you’re ready to apply the base coat.
2. Applying the Base Coat
The base coat creates the foundation for your textured finish. It needs to be applied evenly and allowed to dry fully before layering.
Tools you’ll need:
- Marmarino Medium
- Stainless steel trowel
- Spatula or mixing stick
- Clean water
Application:
- Use your spatula to load material onto the trowel.
- Hold the trowel at a 20–30 degree angle against the wall.
- Apply a thin, even coat across the surface using fan-like, sweeping motions.
- Ensure complete coverage, going all the way to the edges.
- Smooth out any excess material by lightly going back over thicker areas.
- Do not rush—take your time for an even, consistent application.
Once complete, allow the base coat to dry fully overnight before moving to the next step.
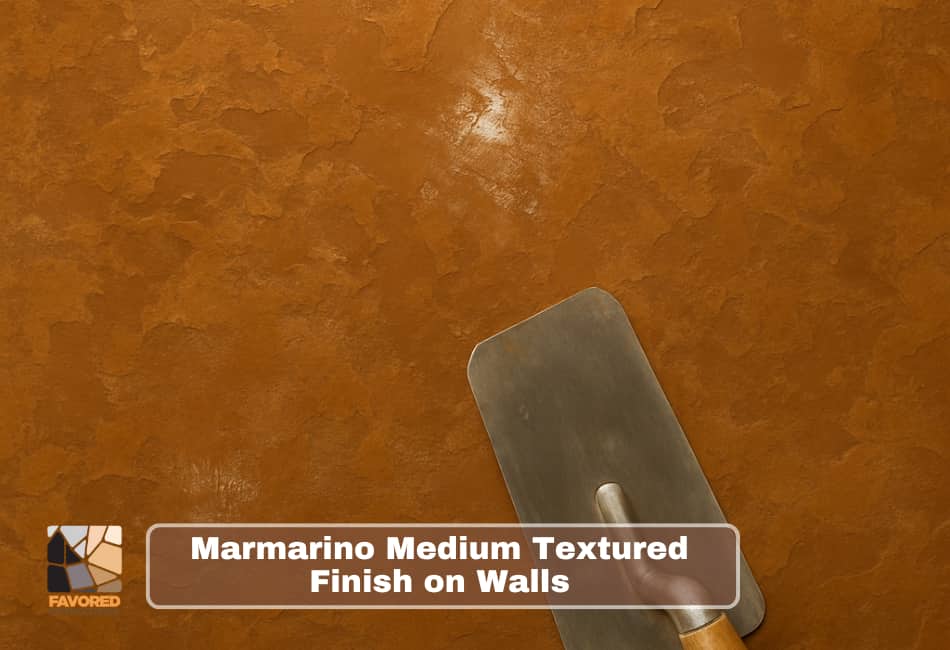
3. Applying the Textured Top Coat
The top coat is where your creativity comes alive. This layer introduces the texture and depth that make Marmarino Medium truly unique.
Tools you’ll need:
- Marmarino Medium
- Stainless steel trowel
- Spatula or mixing stick
- Decorator’s hawk (for large walls)
- Clean water
Application:
- Use your spatula or hawk to load small blobs of Marmarino Medium onto the trowel, spreading them irregularly across the blade.
- Dab the material onto the wall in random, varied patterns.
- Rotate your trowel between dabs to avoid creating repetitive patterns.
- Focus on spreading without uniformity to mimic natural stone-like textures.
- Once the material is dabbed across the wall, pass over it lightly with the trowel.
- Do not press hard—you want to leave texture and raised areas intact.
- If you apply too much pressure, you’ll flatten the surface and lose the 3D effect.
- After lightly smoothing, repeat dabbing and light smoothing as needed until the entire surface is covered.
Aim for an earthy, rocky, organic texture. This style is popular in restaurants, salons, tattoo studios, and other spaces where natural aesthetics meet modern design.
Allow the textured top coat to dry overnight before moving to the waxing stage.
4. Waxing the Textured Finish
Waxing enhances both the appearance and durability of your Marmarino Medium finish. Different waxes can subtly—or dramatically—affect the final look.
Wax options:
- Natural beeswax: For protection without altering color.
- Bronze wax: For a warm, metallic glow.
- Black wax: For a deep, shadowy effect.
Application:
Natural Beeswax:
- Shake the wax well before use.
- Apply an even coat using a Pinello brush, sponge, or flexible trowel.
- Allow the wax to absorb for 30–40 minutes (up to 2 hours depending on temperature).
- Polish in circular motions with a microfiber cloth, removing excess from textured crevices.
- For extra durability, apply a second coat once the first has dried.
Natural beeswax adds light protection and keeps the finish breathable, while preserving the matte, organic texture.
Optional Bronze Wax:
- Apply lightly over the natural beeswax using a clean Pinello brush.
- Allow the wax to sit for 3–5 minutes (longer for a deeper bronze tone).
- Polish with a microfiber cloth, turning the cloth frequently to avoid redepositing excess wax.
Bronze wax creates a subtle shimmer, highlighting the peaks of the texture with warmth.
Optional Black Wax:
- Apply lightly with a clean brush.
- For a dark, moody tone, leave the wax on for 5+ minutes before polishing.
- For a lighter, grey-wash effect, polish immediately after applying.
- Always polish in circular motions using a clean microfiber cloth, switching to fresh sections frequently.
Black wax deepens the natural shadows and enhances the stone-like appearance, giving your wall dramatic depth.
Tips for Working on Large Walls
When scaling this technique to large surfaces:
- Work in 1-meter by 1-meter sections to maintain control and consistency.
- Dab, smooth, and burnish each section before moving on to avoid visible seams.
- Use a decorator’s hawk for easier loading of your trowel.
- Consider a machine polisher for waxing large areas—set to a moderate speed (around 3 out of 6) to avoid overheating the plaster.
Final Thoughts
A Marmarino Medium textured finish is a stunning, artisanal addition to any space. With its natural, rocky appearance and customizable wax finishes, it bridges old-world craftsmanship with contemporary design.
By following this guide:
- You achieve even application and consistent texture.
- You protect and enhance your finish with tailored waxing.
- You build a timeless statement wall that’s both beautiful and durable.
Remember—each wall is unique, just like each artisan’s hand. Take your time, trust your tools, and enjoy the process.