
When working with Venetian plaster, getting the perfect color starts long before the plaster touches the wall. It begins in the mixing stage.
Whether you’re preparing to apply plaster on a statement wall, ceiling, or architectural feature, mixing the ink thoroughly into your plaster is critical to achieving a uniform, vibrant finish.
This guide walks you through how to mix your inks into Venetian plaster products like Marmorino Fine, Marmorino Medium, or Travertino—ensuring your plaster is ready to transform any surface into a work of art.
Gather Your Materials First
Before you start mixing, make sure you have everything you need within reach. You’ll want:
- A clean bucket of fresh water
- A mixing spatula
- Your chosen ink (labelled for the correct plaster type)
- Your selected plaster (Marmorino Fine, Marmorino Medium, or Travertino)
Each ink is labeled for the plaster it’s designed to be used with, so no guesswork is required. This labeling ensures compatibility between the ink and plaster type for consistent results.
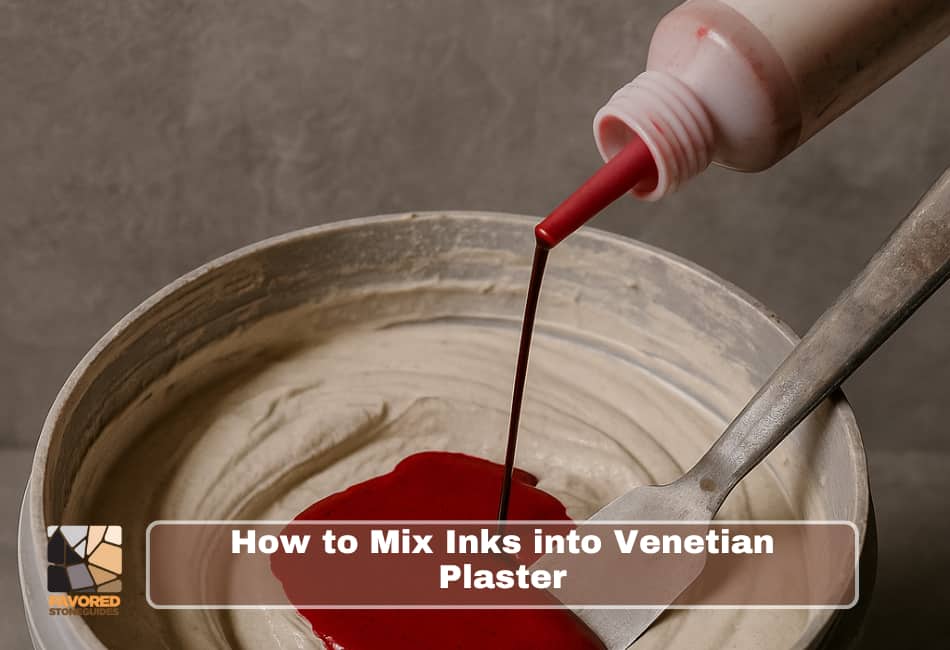
Step 1: Add the Ink
Pour the entire contents of the ink container into your tub of plaster. Use your spatula to scrape out every last drop to ensure full color saturation.
For smaller tubs, a hand mixing spatula works well. For larger volumes, a mixing drill with a whisk attachment will save you time and energy.
Step 2: Mix Thoroughly
This step is crucial. Mixing your ink into the plaster evenly ensures that the color is distributed consistently across the entire surface once applied. If the ink is not fully incorporated, you risk streaks, patches, or uneven color.
Work the spatula deep into the tub, scraping from the bottom to the top. The white plaster at the base of the tub needs to be lifted and blended with the colored portion. Continue mixing until the color looks uniform throughout, with no streaks or pale pockets.
Why Even Mixing Matters
When applying Venetian plaster to a large wall or ceiling, any inconsistency in color will stand out—especially under lighting.
A thorough mix ensures that every stroke of plaster you apply brings the same hue and intensity. This is particularly important for feature walls where the finish will be under close inspection.
If your client requests a specific color, most suppliers can match shades from standard color charts. This opens up possibilities for custom tones like muted greys, earthy beiges, or soft pinks to suit any interior design.
Step 3: Clean Your Tools
Once mixing is complete, rinse your mixing spatula (or whisk if using a drill) in clean water immediately. Dry plaster is hard to remove and can contaminate your tools for future use.
Mixing Larger Batches
For large-scale projects covering expansive walls or ceilings, mixing by hand may not be practical. In those cases, a mixing drill fitted with a whisk attachment makes light work of the process.
Use the same principle: scrape from the bottom, work the sides, and ensure no uncolored plaster remains at the base of the tub. Take your time; a well-mixed batch will save you headaches during application.
Final Checks Before Application
After mixing, visually check the plaster to confirm a consistent, even color. You can also do a small test patch on a hidden area of the wall to preview the color once dry.
Once you’re confident in your mix, your plaster is ready to apply.
Key Takeaways for Ink Mixing Success
- Always use the ink recommended for your specific plaster type
- Mix thoroughly to avoid color inconsistencies
- Use a drill and whisk for larger tubs to save time and effort
- Clean your tools immediately after mixing
- Do a test patch if you’re unsure about the final color outcome
Final Thoughts
Mixing inks into Venetian plaster isn’t just a technical step—it’s the beginning of the transformation process that brings walls to life. By dedicating time to mix thoroughly and correctly, you set the stage for a flawless, cohesive finish across every surface you apply.
Once your plaster is colored and ready, you’re all set to move on to the exciting part: applying the base coat and seeing your design vision come together.
Stay tuned for more expert tips and step-by-step guides as you continue mastering the art of Venetian plaster.